


Mailchimp API 3.0 – PHP and AJAX subscription / unsubscription

Table of Contents
Ok, if you are reading this post, you already know something about mailchimp and use default Mailchimp sign up forms maybe.
But what if you want your forms to be more customizable for your website purposes, such as:
- original form design,
- mailchimp subscription built-in another form (sign up checkbox in custom form — look at my comment form),
- no confirmation emails,
- subscribe or unsubscribe users via your website administration area etc.
First of all insert this function into your website code. If you use WordPress, it can be functions.php file.
function rudr_mailchimp_subscriber_status( $email, $status, $list_id, $api_key, $merge_fields = array('FNAME' => '','LNAME' => '') ){
	$data = array(
		'apikey'        => $api_key,
    	'email_address' => $email,
		'status'        => $status,
		'merge_fields'  => $merge_fields
	);
	$mch_api = curl_init(); // initialize cURL connection

	curl_setopt($mch_api, CURLOPT_URL, 'https://' . substr($api_key,strpos($api_key,'-')+1) . '.api.mailchimp.com/3.0/lists/' . $list_id . '/members/' . md5(strtolower($data['email_address'])));
	curl_setopt($mch_api, CURLOPT_HTTPHEADER, array('Content-Type: application/json', 'Authorization: Basic '.base64_encode( 'user:'.$api_key )));
	curl_setopt($mch_api, CURLOPT_USERAGENT, 'PHP-MCAPI/2.0');
	curl_setopt($mch_api, CURLOPT_RETURNTRANSFER, true); // return the API response
	curl_setopt($mch_api, CURLOPT_CUSTOMREQUEST, 'PUT'); // method PUT
	curl_setopt($mch_api, CURLOPT_TIMEOUT, 10);
	curl_setopt($mch_api, CURLOPT_POST, true);
	curl_setopt($mch_api, CURLOPT_SSL_VERIFYPEER, false);
	curl_setopt($mch_api, CURLOPT_POSTFIELDS, json_encode($data) ); // send data in json

	$result = curl_exec($mch_api);
	return $result;
}
Ok, now let me show what each parameter means.
(string) I hope it is clear for you.
$status
(string) Subscriber status to set:
subscribedunsubscribedcleanedpending(confirmation email will be sent)
$list_id
(string) Mailchimp list ID you want to add subscribers to. How to obtain it?
$api_key
(string) API key.
$merge_fields
(array) Subscriber fields, can be configured in a list settings. By default each mailchimp list has two merge fields (except email) — subscriber first name $merge_fields['FNAME'] and last name $merge_fields['LNAME'].
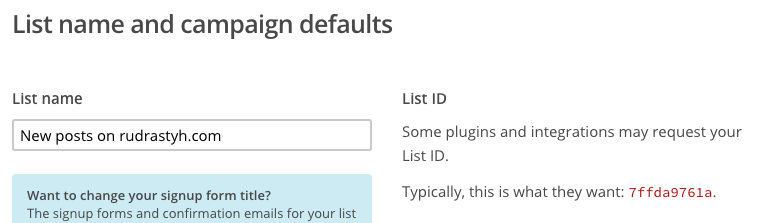
How to get Mailchimp list ID?
Login to Mailchimp, go to Lists then click on the list title, then in list menu Settings > List name and defaults.
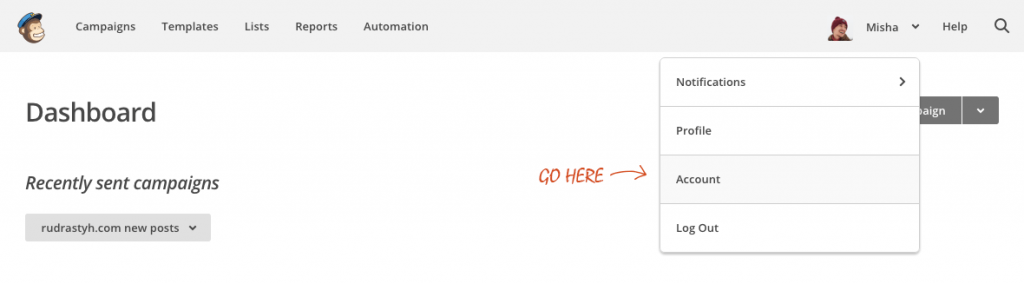
How to get Mailchimp API keys?
1. In main Mailchimp menu click on your picture and go to Account.
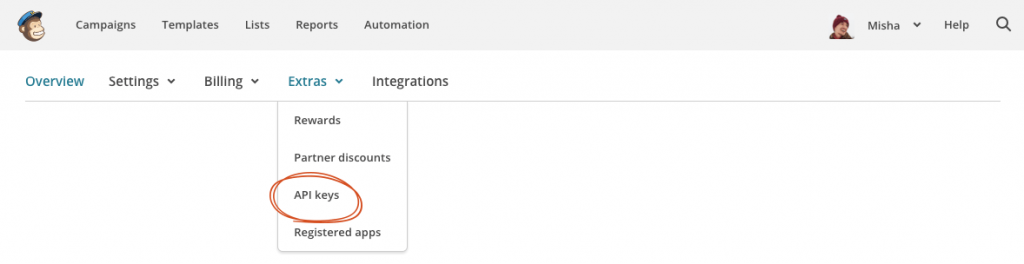
2. Then choose Extras > API keys.
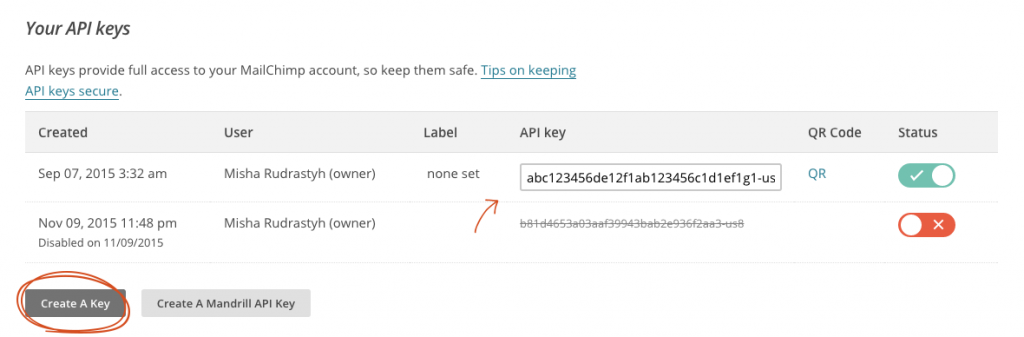
3. That’s it. Click on Create A Key and your new API key will appear.
PHP Subscription example
Do not forget to copy the rudr_mailchimp_subscriber_status() function to your website code (you can find it at the beginning of the post).
$email = '[email protected]';
$status = 'subscribed'; // "subscribed" or "unsubscribed" or "cleaned" or "pending"
$list_id = 'YOUR LIST ID HERE'; // where to get it read above
$api_key = 'YOUR MAILCHIMP API KEY HERE'; // where to get it read above
$merge_fields = array('FNAME' => 'Misha','LNAME' => 'Rudrastyh');

rudr_mailchimp_subscriber_status($email, $status, $list_id, $api_key, $merge_fields );
The very simple example. Do you think so?
AJAX Subscription example (WordPress-friendly)
Actually my blog is about WordPress, so the AJAX example will be adapted for WordPress.
Step 1. Sign Up form HTML
This form will work properly only if the JavaScript is enabled in user browser. You can also upgrade it to work both with JavaScript and without it.
<form action="<?php echo site_url() ?>/wp-admin/admin-ajax.php" id="mailchimp">
	<!-- for my website the site_url() function returns https://rudrastyh.com -->
	<input type="text" name="fname" placeholder="First name" />
	<input type="text" name="lname" placeholder="Last name" />
	<input type="email" name="email" placeholder="Email *" required />

	<input type="hidden" name="action" value="mailchimpsubscribe" />
	<!-- we need action parameter to receive ajax request in WordPress -->

	<button>Subscribe</button>
</form>
Step 2. jQuery code to send asynchronous request
Make sure that jQuery library is included to your website pages.
jQuery(function($){
	$('#mailchimp').submit(function(){
		var mailchimpform = $(this);
		$.ajax({
			url:mailchimpform.attr('action'),
			type:'POST',
			data:mailchimpform.serialize(),
			success:function(data){
				alert(data);
			}
		});
		return false;
	});
});
Step 3. PHP code for your functions.php file. Errors Handling
function rudr_mch_subscribe(){
	$list_id = 'YOUR LIST ID HERE';
	$api_key = 'YOUR MAILCHIMP API KEY HERE';
	$result = json_decode( rudr_mailchimp_subscriber_status($_POST['email'], 'subscribed', $list_id, $api_key, array('FNAME' => $_POST['fname'],'LNAME' => $_POST['lname']) ) );
	// print_r( $result );
	if( $result->status == 400 ){
		foreach( $result->errors as $error ) {
			echo '<p>Error: ' . $error->message . '</p>';
		}
	} elseif( $result->status == 'subscribed' ){
		echo 'Thank you, ' . $result->merge_fields->FNAME . '. You have subscribed successfully';
	}
	// $result['id'] - Subscription ID
	// $result['ip_opt'] - Subscriber IP address
	die;
}

add_action('wp_ajax_mailchimpsubscribe','rudr_mch_subscribe');
add_action('wp_ajax_nopriv_mailchimpsubscribe','rudr_mch_subscribe');