


How to make for WordPress 5.8.2 Better Security

Table of Contents
This is step-by-step tutorial about protecting your WordPress blog, but before we begin, you should know some simple things:
- always update your WordPress blog, plugins and themes, because new versions often have important security fixes
- please use really strong password (do not use «12345» or «qwerty»!)
- connect your site using only SFTP client
- and don’t forget to install antivirus program on your PC
Step 1. Backup
The thing you have to do at first is to backup you database. You can backup it manually in phpMyAdmin by going to the Export tab.

Another way – is to use WordPress plugin, which allows you to create database backups. There are plenty of such plugins but today I recommend you to use BackWPUp.
After you have created your database backup you can backup your theme files and uploads folder. Do it anyway you want (SFTP for example).
WordPress core files and plugins do not need to be backuped, unless their files wasn’t changed, because you can always download the latest clean version of WordPress and install the plugins (without malicious code, which could spread through your website files before).
Step 2. Chmod
You should setup the following permissions for WordPress files and folders:
| Folder / File | Chmod |
|---|---|
| /wp-content/ | 755 (or 777 if needed) |
| /wp-content/themes/ | 755 |
| /wp-content/plugins/ | 755 |
| /wp-admin/ | 755 |
| /wp-includes/ | 755 |
| wp-config.php | 400 (or 440) |
To setup chmod rights you can use your SFTP client.
Step 3. Securing admin area
Second layer of protection
This is a real strong protection but I don’t recommend it when:
- if you are using
admin-ajax.phphandler on your website - if you are not the only author on the blog
So, this is how to do it. In fact, there is two ways – secure with password or secure by IP address. Let’s begin with additional password protection. You need create two files in wp-admin directory – .htaccess and .htpasswd
Content of the .htaccess file:
AuthType Basic
# Welcome message
AuthName "Hi, Dude!"
# Full path to .htpasswd file
AuthUserFile /home/tomdesign.vn/public_html/wp-admin/.htpasswd
require valid-user
The .htpasswd file should contain usernames and passwords, each pair on the next line. You can create your encoded passwords on this page.
Example content of the .htpasswd file:
user1:$apr1$lw9zPE5c$uTNLHKL6LTk4M4awpGHlZ0
user2:$apr1$xpogQMCP$kC9GZ8ufEMfABa5NfjvGP1
Completely block admin area by IP address
If you do not want to log in admin area twice, you can just block it by IP address. All you need is to put in /wp-admin/ directory the .htaccess file with the following content:
satisfy any
order deny,allow
deny from all
allow from 11.178.207.255
#you can specify another lines with allowed IP addresses
require valid-user
Step 4. Securing from brute force attacks
Changing default error messages on failed log-ins.
When you fails, WordPress will show you, what was wrong – login or password by default. This can be useful for hackers to start a brute force attack. So, they can get your password if they know your login.
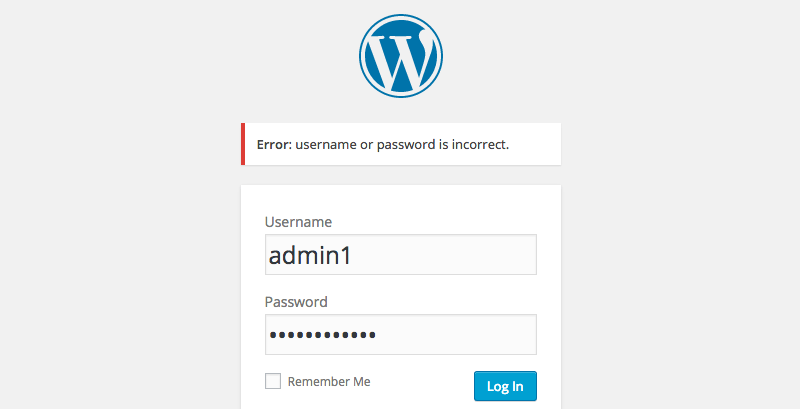
There are two default error messages in WordPress. When username is not valid:

And when username is ok, but the password is wrong:
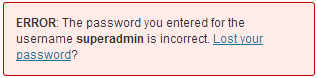
There is an easy hook which allows you to split this two error messages in one, e.g. “Error: Username or password is incorrect.” Put this code into your functions.php file.
function remove_default_login_errors(){
	return 'Error: username or password is incorrect.';
}
add_filter( 'login_errors', 'remove_default_login_errors' );
This is the result:
Changing default admin username
Everybody knows the WordPress default admin username. The hackers knows it too, of course.
So, this function allows you to change login of any user anytime you want.
function true_change_username( $new_username, $user_id = 1) {
	global $wpdb;
	$wpdb->update(
		$wpdb->prefix . 'users',
		array( 'user_login' => $new_username ),
		array( 'ID' => $user_id ),
		array( '%s' ),
		array( '%d' )
	);
}$new_username(string) new username$user_id(integer) ID of the user you want to change username, by default – admin user with ID = 1
Insert this function into your website and then just run it once.
true_change_username( 'superadmin' ); // this will change default admin username
How to hide usernames from comment class
So, you have changed your username but what if this didn’t help? And why? Now look at my screenshot, this is HTML code of a user comment on the blog:

Yes, this is a username. And when you’ve logged in as admin and have posted a comment, hackers can easily gets your login. How to prevent this?
The first way is not using admin account for commenting the blog. The second and the best way is simply to change or hide admin username from comment class attribute by inserting the following code into your theme functions.php file.
function true_username_css_class( $classes ) {
	foreach( $classes as $key => $class ) {
		if(strstr($class, "comment-author-superadmin")) {
		// you should change superadmin to your current username
			$classes[$key] = 'comment-author-admin'; // if you want to cheet hackers, or just comment-admin, if you want to completely hide username from the class
		}
	}
	return $classes;
}

add_filter('comment_class', 'true_username_css_class');
If you want to remove all the usernames from comment class:
function true_completely_remove_css_class( $classes ) {
	foreach( $classes as $key => $class ) {
		if(strstr($class, "comment-author-")) {
			unset( $classes[$key] );
		}
	}
	return $classes;
}
add_filter('comment_class', 'true_completely_remove_css_class');
Limit the number of login attempt
There is great plugin, Simple Login LockDown. It disables login function for a certain IP range, if more than a given number of attemps are detected from this range within a short period of time.
Step 5. Securing configuration file
I mean wp-config.php. This file contains database username and password, so, it must be protected as well. How to do it? Just move your website wp-config.php into the directory above your website folder.
You can also protect it with .htaccess rules, put this code in .htaccess file which is situated in the same directory with wp-config.php.
order allow,deny
deny from all
Step 6. Disable file editor
If someone has an access to your website dashboard as an administrator, he probably also can edit website theme and plugin files. To prevent this ability from anyone, you should add the following line into wp-config.php file.
define('DISALLOW_FILE_EDIT', true);After you have done that, the editor will disappears at all. Also it would not be available by the URL.
Step 7. Changing database prefix
If you have not installed your blog yet, you can setup database prefix within the installation process.
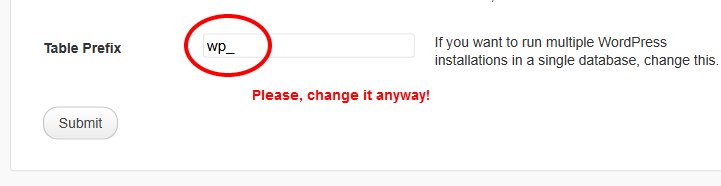
If you have already installed WordPress blog – follow this instructions.
At first, you should open your wp-config.php file and change this line:
$table_prefix = 'wp_';
to this for example:
$table_prefix = 'new1234_';
After that you should run a couple SQL queries. You can do it in phpMyAdmin SQL tab. There are the queries:
RENAME TABLE wp_commentmeta TO new1234_commentmeta;
RENAME TABLE wp_comments TO new1234_comments;
RENAME TABLE wp_links TO new1234_links;
RENAME TABLE wp_options TO new1234_options;
RENAME TABLE wp_postmeta TO new1234_postmeta;
RENAME TABLE wp_posts TO new1234_posts;
RENAME TABLE wp_terms TO new1234_terms;
RENAME TABLE wp_term_relationships TO new1234_term_relationships;
RENAME TABLE wp_term_taxonomy TO new1234_term_taxonomy;
RENAME TABLE wp_usermeta TO new1234_usermeta;

UPDATE new1234_options SET option_name = 'new1234_user_roles' WHERE option_name = 'wp_user_roles';
UPDATE new1234_usermeta SET meta_key = 'new1234_capabilities' WHERE meta_key = 'wp_capabilities';
Step 8. Removing WordPress version from RSS feed and from website <head>
This can be very important step, especially if you don’t update your WordPress regularly. It also the simpliest step to do. Just insert the following code into your functions.php file:
function remove_wp_version() {
	return '';
}
add_filter('the_generator', 'remove_wp_version');
Step 9. Prevent hotlinking of images
So, the hotlinking is when someone steal your website content (usually images) and insert direct links to them on their own websites. The problem is that they steal not only images but also your bandwidth.
And how we can prevent this? Pretty simple! There would be another code for your .htaccess. You can use .htaccess situated in your website root directory but also the one in the directory with images.
# this line may already be in the file
RewriteEngine On

# list here the websites with allowed access to your images
# DO NOT FORGET TO SPECIFY YOUR OWN DOMAIN!
RewriteCond %{HTTP_REFERER} !^http://(.+\.)?google\.com/.*$ [NC]
RewriteCond %{HTTP_REFERER} !^http://(.+\.)?yahoo\.com/.*$ [NC]

RewriteCond %{HTTP_REFERER} !^$ [NC]

# hotlink.png is the image which will be requested instead of your website images
RewriteRule .*\.(jpe?g|gif|bmp|png)$ hotlink.png [L]
Step 10. Protect your uploads directory
This code denies access to any file in a directory except files with given extensions. So, it also disables PHP files execution in this directory (and also in all its child directories).
#at first we completely disable access to all the files
<FilesMatch ^>
	Order Allow,Deny
	Deny from all
</FilesMatch>
#after that add file extensions you want to allow access
<filesmatch ".(jpg|jpeg|jpe|gif|png|tif|tiff|pdf)$"="">
	Order Deny,Allow
	Allow from all
</FilesMatch>
Or you can only disable PHP files execution:
<Files *.php>
	deny from all
</Files>
I recommend you to protect /wp-includes/ directory as well.
Step 11. Remove unnecessary files
First file you should remove is readme.html, located in you blog root folder. This file contains the WordPress version you use. Remember that hackers can find proper exploit for the exact version of WordPress.
Another file is install.php located in /wp-admin/ directory. This is installation script and also should be removed.
Removed files will appear again after every WordPress update.