


How to Add Custom Meta Box in WordPress 5.8.2

Table of Contents
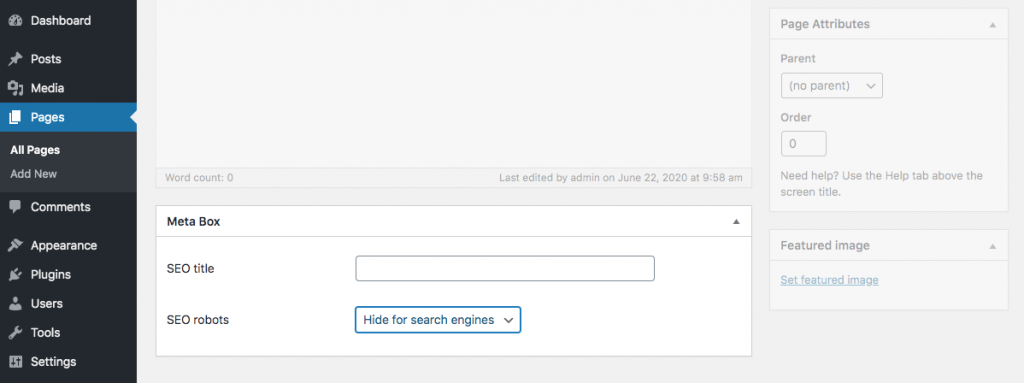
Finally we came to the part of the tutorial where I am going to show you how to create a meta box in WordPress, here is a screenshot, just to remind you:
Step 1. add_meta_box()
Let’s begin with add_meta_box() function inside admin_menu action hook, but add_meta_boxes action hook is also ok.
add_action( 'admin_menu', 'misha_add_metabox' );
function misha_add_metabox() {
	add_meta_box(
		'misha_metabox', // metabox ID
		'Meta Box', // title
		'misha_metabox_callback', // callback function
		'page', // post type or post types in array
		'normal', // position (normal, side, advanced)
		'default' // priority (default, low, high, core)
	);
}

function misha_metabox_callback( $post ) {
	echo 'hey';
}
Once you insert this code to functions.php of your child theme or in a custom plugin, this meta box should appear:
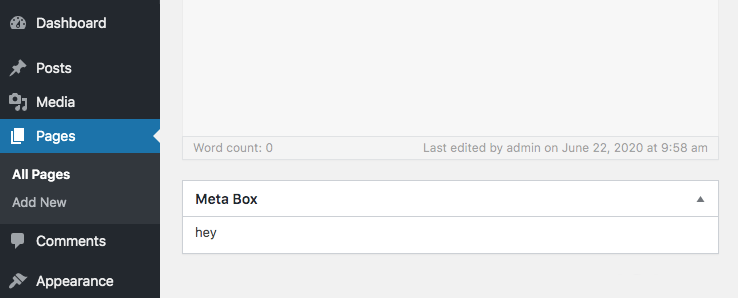
add_meta_box() function.As you can see all we printed inside the callback function is now displayed inside the meta box.
Let’s dive into it and fill our metabox with fields.
Step 2. Callback function with meta box HTML
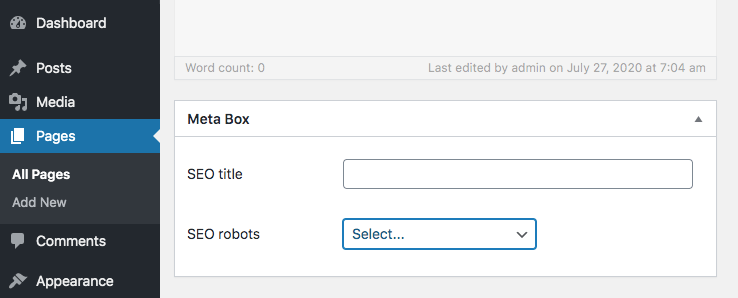
In the code below I populated our meta box with multiple fields.
function misha_metabox_callback( $post ) {
	$seo_title = get_post_meta( $post->ID, 'seo_title', true );
	$seo_robots = get_post_meta( $post->ID, 'seo_robots', true );

	// nonce, actually I think it is not necessary here
	wp_nonce_field( 'somerandomstr', '_mishanonce' );

	echo '<table class="form-table">
		<tbody>
			<tr>
				<th><label for="seo_title">SEO title</label></th>
				<td><input type="text" id="seo_title" name="seo_title" value="' . esc_attr( $seo_title ) . '" class="regular-text"></td>
			</tr>
			<tr>
				<th><label for="seo_tobots">SEO robots</label></th>
				<td>
					<select id="seo_robots" name="seo_robots">
						<option value="">Select...</option>
						<option value="index,follow"' . selected( 'index,follow', $seo_robots, false ) . '>Show for search engines</option>
						<option value="noindex,nofollow"' . selected( 'noindex,nofollow', $seo_robots, false ) . '>Hide for search engines</option>
					</select>
				</td>
			</tr>
		</tbody>
	</table>';

}
Our meta box:
Step 3. Save meta box data
If you are using this metabox on the page edit screen or for a custom post type, don’t forget to redefine supported post types on line 23, otherwise metabox data won’t be saved.
Functions update_post_meta() and delete_post_meta() (lines 27-36) should be called for each input field in your meta box.
add_action( 'save_post', 'misha_save_meta', 10, 2 );

function misha_save_meta( $post_id, $post ) {

	// nonce check
	if ( ! isset( $_POST[ '_mishanonce' ] ) || ! wp_verify_nonce( $_POST[ '_mishanonce' ], 'somerandomstr' ) ) {
		return $post_id;
	}

	// check current use permissions
	$post_type = get_post_type_object( $post->post_type );

	if ( ! current_user_can( $post_type->cap->edit_post, $post_id ) ) {
		return $post_id;
	}

	// Do not save the data if autosave
	if ( defined('DOING_AUTOSAVE') && DOING_AUTOSAVE ) {
		return $post_id;
	}

	// define your own post type here
	if( $post->post_type != 'page' ) {
		return $post_id;
	}

	if( isset( $_POST[ 'seo_title' ] ) ) {
		update_post_meta( $post_id, 'seo_title', sanitize_text_field( $_POST[ 'seo_title' ] ) );
	} else {
		delete_post_meta( $post_id, 'seo_title' );
	}
	if( isset( $_POST[ 'seo_robots' ] ) ) {
		update_post_meta( $post_id, 'seo_robots', sanitize_text_field( $_POST[ 'seo_robots' ] ) );
	} else {
		delete_post_meta( $post_id, 'seo_robots' );
	}

	return $post_id;

}
Please keep in mind, that depending on your field type you must use sanitization, so in the above example I am using sanitize_text_field() function, but there are also another ones, like sanitize_textarea() for textarea fields, sanitize_email() etc.