


Create a Payment Gateway Plugin for WooCommerce

Table of Contents
Step 1. We begin with creating a plugin
In case you don’t know, custom payment methods are just plugins. So we have to create one.
When I first heard about plugins for WordPress I thought it is so hard to create one. But actually, to create a plugin you just need to create a file and add a couple lines of code inside it.
So, in the /plugins folder I created misha-gateway.php file and added the following code there. In case your plugin will have more than one file, place it in the folder with the same name, example: misha-gateway/misha-gateway.php.
<?php
/*
 * Plugin Name: WooCommerce Custom Payment Gateway
 * Plugin URI: https://rudrastyh.com/woocommerce/payment-gateway-plugin.html
 * Description: Take credit card payments on your store.
 * Author: Misha Rudrastyh
 * Author URI: http://rudrastyh.com
 * Version: 1.0.1
 */
Once you did it, the plugin will appear in your admin area! And you can even activate it.

Step 2. Payment Gateways are PHP classes. Here is the class skeleton.
So we have to create a custom PHP Class to extend WooCommerce WC_Payment_Gateway class.
Every class method is described below. You can begin with copying and pasting the below code into your main plugin file.
/*
 * This action hook registers our PHP class as a WooCommerce payment gateway
 */
add_filter( 'woocommerce_payment_gateways', 'misha_add_gateway_class' );
function misha_add_gateway_class( $gateways ) {
	$gateways[] = 'WC_Misha_Gateway'; // your class name is here
	return $gateways;
}

/*
 * The class itself, please note that it is inside plugins_loaded action hook
 */
add_action( 'plugins_loaded', 'misha_init_gateway_class' );
function misha_init_gateway_class() {

	class WC_Misha_Gateway extends WC_Payment_Gateway {

 		/**
 		 * Class constructor, more about it in Step 3
 		 */
 		public function __construct() {

		...

 		}

		/**
 		 * Plugin options, we deal with it in Step 3 too
 		 */
 		public function init_form_fields(){

		...

	 	}

		/**
		 * You will need it if you want your custom credit card form, Step 4 is about it
		 */
		public function payment_fields() {

		...

		}

		/*
		 * Custom CSS and JS, in most cases required only when you decided to go with a custom credit card form
		 */
	 	public function payment_scripts() {

		...

	 	}

		/*
 		 * Fields validation, more in Step 5
		 */
		public function validate_fields() {

		...

		}

		/*
		 * We're processing the payments here, everything about it is in Step 5
		 */
		public function process_payment( $order_id ) {

		...

	 	}

		/*
		 * In case you need a webhook, like PayPal IPN etc
		 */
		public function webhook() {

		...

	 	}
 	}
}
If you inserted the code above “as is” in your plugin file, you get 500 error, because this code just shows the plugin class structure, where each method should be.
Step 3. Payment Gateway Plugin Options
In the class constructor we:
- Define class properties, like gateway ID and name, lines 23-33,
- Initialize the settings, lines 35-39,
- Append options to class properties, lines 40-45,
- Save options, line 48,
- Enqueue custom JavaScript and CSS if needed, line 51.
We can also register payment gateway webhooks in class constructor (example on line 54).
public function __construct() {

	$this->id = 'misha'; // payment gateway plugin ID
	$this->icon = ''; // URL of the icon that will be displayed on checkout page near your gateway name
	$this->has_fields = true; // in case you need a custom credit card form
	$this->method_title = 'Misha Gateway';
	$this->method_description = 'Description of Misha payment gateway'; // will be displayed on the options page

	// gateways can support subscriptions, refunds, saved payment methods,
	// but in this tutorial we begin with simple payments
	$this->supports = array(
		'products'
	);

	// Method with all the options fields
	$this->init_form_fields();

	// Load the settings.
	$this->init_settings();
	$this->title = $this->get_option( 'title' );
	$this->description = $this->get_option( 'description' );
	$this->enabled = $this->get_option( 'enabled' );
	$this->testmode = 'yes' === $this->get_option( 'testmode' );
	$this->private_key = $this->testmode ? $this->get_option( 'test_private_key' ) : $this->get_option( 'private_key' );
	$this->publishable_key = $this->testmode ? $this->get_option( 'test_publishable_key' ) : $this->get_option( 'publishable_key' );

	// This action hook saves the settings
	add_action( 'woocommerce_update_options_payment_gateways_' . $this->id, array( $this, 'process_admin_options' ) );

	// We need custom JavaScript to obtain a token
	add_action( 'wp_enqueue_scripts', array( $this, 'payment_scripts' ) );

	// You can also register a webhook here
	// add_action( 'woocommerce_api_{webhook name}', array( $this, 'webhook' ) );
 }
Depending on the payment processor you use, the option fields could be different, but in most cases you will have “Enabled/Disabled”, “Title”, “Description” and “Test mode” options.
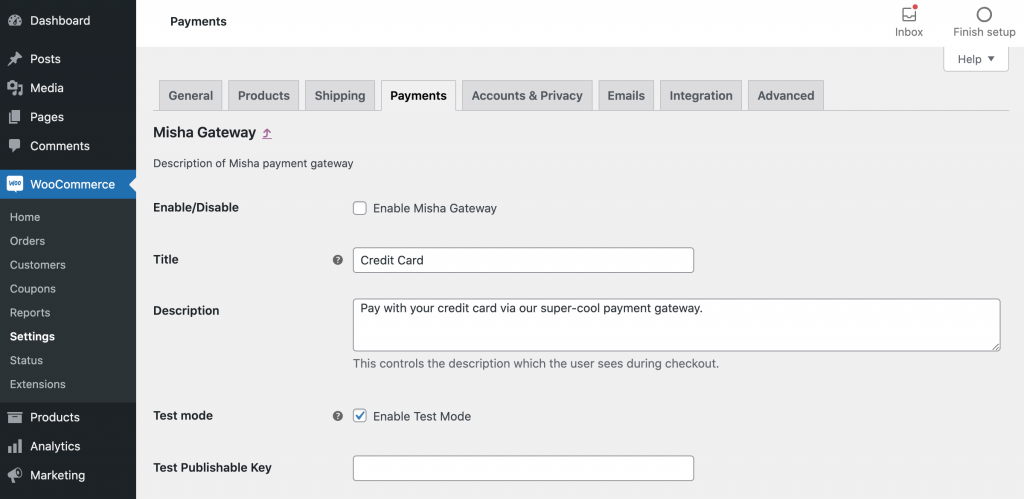
public function init_form_fields(){

	$this->form_fields = array(
		'enabled' => array(
			'title'       => 'Enable/Disable',
			'label'       => 'Enable Misha Gateway',
			'type'        => 'checkbox',
			'description' => '',
			'default'     => 'no'
		),
		'title' => array(
			'title'       => 'Title',
			'type'        => 'text',
			'description' => 'This controls the title which the user sees during checkout.',
			'default'     => 'Credit Card',
			'desc_tip'    => true,
		),
		'description' => array(
			'title'       => 'Description',
			'type'        => 'textarea',
			'description' => 'This controls the description which the user sees during checkout.',
			'default'     => 'Pay with your credit card via our super-cool payment gateway.',
		),
		'testmode' => array(
			'title'       => 'Test mode',
			'label'       => 'Enable Test Mode',
			'type'        => 'checkbox',
			'description' => 'Place the payment gateway in test mode using test API keys.',
			'default'     => 'yes',
			'desc_tip'    => true,
		),
		'test_publishable_key' => array(
			'title'       => 'Test Publishable Key',
			'type'        => 'text'
		),
		'test_private_key' => array(
			'title'       => 'Test Private Key',
			'type'        => 'password',
		),
		'publishable_key' => array(
			'title'       => 'Live Publishable Key',
			'type'        => 'text'
		),
		'private_key' => array(
			'title'       => 'Live Private Key',
			'type'        => 'password'
		)
	);
}
If you’ve done everything correctly, your options page should look like this:
Step 4. Direct Checkout Form
Before implementing the code below, please read these key points:
- If you’re creating a payment gateway like PayPal, where all the user actions happen on the payment gateway website, you can skip this step, just do not add
payment_fields()andvalidate_fields()methods and continue to Step 5. - In this tutorial I assume that you use a payment processor that sends card data with its own AJAX-request and gives you a token that you can use in PHP, so do not (!) add
nameattributes to the card form fields. This is how it works by step:- Customer fills his card data and clicks “Place Order” button.
- We delay the form submission using
checkout_place_orderevent in WooCommerce and send AJAX request with card data directly to our payment processor, - If customer details are OK, the processor returns a token and we add it to our form below,
- Now we can submit the form (in JS of course),
- We use the token in PHP to capture a payment via payment processor’s API.
4.1 Enqueue scripts
In step 2 we’ve already added wp_enqueue_scripts action hook and connect payment_scripts() method to it.
public function payment_scripts() {

	// we need JavaScript to process a token only on cart/checkout pages, right?
	if ( ! is_cart() && ! is_checkout() && ! isset( $_GET['pay_for_order'] ) ) {
		return;
	}

	// if our payment gateway is disabled, we do not have to enqueue JS too
	if ( 'no' === $this->enabled ) {
		return;
	}

	// no reason to enqueue JavaScript if API keys are not set
	if ( empty( $this->private_key ) || empty( $this->publishable_key ) ) {
		return;
	}

	// do not work with card detailes without SSL unless your website is in a test mode
	if ( ! $this->testmode && ! is_ssl() ) {
		return;
	}

	// let's suppose it is our payment processor JavaScript that allows to obtain a token
	wp_enqueue_script( 'misha_js', 'https://www.mishapayments.com/api/token.js' );

	// and this is our custom JS in your plugin directory that works with token.js
	wp_register_script( 'woocommerce_misha', plugins_url( 'misha.js', __FILE__ ), array( 'jquery', 'misha_js' ) );

	// in most payment processors you have to use PUBLIC KEY to obtain a token
	wp_localize_script( 'woocommerce_misha', 'misha_params', array(
		'publishableKey' => $this->publishable_key
	) );

	wp_enqueue_script( 'woocommerce_misha' );

}
4.2 Obtain a token in JavaScript
Before all I want to say that for every payment processor this code could be different, but the main idea is the same. Here is the content for your misha.js file:
var successCallback = function(data) {

	var checkout_form = $( 'form.woocommerce-checkout' );

	// add a token to our hidden input field
	// console.log(data) to find the token
	checkout_form.find('#misha_token').val(data.token);

	// deactivate the tokenRequest function event
	checkout_form.off( 'checkout_place_order', tokenRequest );

	// submit the form now
	checkout_form.submit();

};

var errorCallback = function(data) {
    console.log(data);
};

var tokenRequest = function() {

	// here will be a payment gateway function that process all the card data from your form,
	// maybe it will need your Publishable API key which is misha_params.publishableKey
	// and fires successCallback() on success and errorCallback on failure
	return false;

};

jQuery(function($){

	var checkout_form = $( 'form.woocommerce-checkout' );
	checkout_form.on( 'checkout_place_order', tokenRequest );

});
4.3 Form with card data
With payment_fields() class method you can create a payment form with card fields like this:

Below is the code:
public function payment_fields() {

	// ok, let's display some description before the payment form
	if ( $this->description ) {
		// you can instructions for test mode, I mean test card numbers etc.
		if ( $this->testmode ) {
			$this->description .= ' TEST MODE ENABLED. In test mode, you can use the card numbers listed in <a href="#">documentation</a>.';
			$this->description  = trim( $this->description );
		}
		// display the description with <p> tags etc.
		echo wpautop( wp_kses_post( $this->description ) );
	}

	// I will echo() the form, but you can close PHP tags and print it directly in HTML
	echo '<fieldset id="wc-' . esc_attr( $this->id ) . '-cc-form" class="wc-credit-card-form wc-payment-form" style="background:transparent;">';

	// Add this action hook if you want your custom payment gateway to support it
	do_action( 'woocommerce_credit_card_form_start', $this->id );

	// I recommend to use inique IDs, because other gateways could already use #ccNo, #expdate, #cvc
	echo '<div class="form-row form-row-wide"><label>Card Number <span class="required">*</span></label>
		<input id="misha_ccNo" type="text" autocomplete="off">
		</div>
		<div class="form-row form-row-first">
			<label>Expiry Date <span class="required">*</span></label>
			<input id="misha_expdate" type="text" autocomplete="off" placeholder="MM / YY">
		</div>
		<div class="form-row form-row-last">
			<label>Card Code (CVC) <span class="required">*</span></label>
			<input id="misha_cvv" type="password" autocomplete="off" placeholder="CVC">
		</div>
		<div class="clear"></div>';

	do_action( 'woocommerce_credit_card_form_end', $this->id );

	echo '<div class="clear"></div></fieldset>';

}
Step 5. Process payments
5.1 Validate fields
I know that checkout fields like First name should be validated earlier, but this is just an example:
public function validate_fields(){

	if( empty( $_POST[ 'billing_first_name' ]) ) {
		wc_add_notice(  'First name is required!', 'error' );
		return false;
	}
	return true;

}
5.2 Capture payments with API and set the order status
Prepare for a lot of text
- Once you get the order object with
wc_get_order()function, you can use its methods likeget_billing_first_name(),get_billing_country(),get_billing_address_1()etc to get the customer billing and shipping details (by the way you can find all the methods inincludes/class-wc-order.phpwhich is in WooCommerce plugin folder). You can also get the billing details from$_POSTarray, at the moment of writing this tutorial I’m not sure what is better. - You can add notes to the order with
$order->add_order_note()method, it can be notes to customer (will be displayed in member’s area) and private notes (only on edit order pages).
Order notes on Edit Order pages - In this tutorial we consider using direct payments without going to gateway websites. But if for your purposes customers must go to a payment gateway website to complete their payment, you have to skip Step 4 and in this step instead capturing the payments with
wp_remote_post(), useadd_query_arg()to build a correct redirect URL to your payment gateway checkout page. - Use
$order->get_total()to receive the order amount. get_woocommerce_currency()should help you to get current shop currency.- If your payment gateway asks to list all the products in a order, use
$order->get_items()
public function process_payment( $order_id ) {

	global $woocommerce;

	// we need it to get any order detailes
	$order = wc_get_order( $order_id );


	/*
 	 * Array with parameters for API interaction
	 */
	$args = array(

		...

	);

	/*
	 * Your API interaction could be built with wp_remote_post()
 	 */
	 $response = wp_remote_post( '{payment processor endpoint}', $args );


	 if( !is_wp_error( $response ) ) {

		 $body = json_decode( $response['body'], true );

		 // it could be different depending on your payment processor
		 if ( $body['response']['responseCode'] == 'APPROVED' ) {

			// we received the payment
			$order->payment_complete();
			$order->reduce_order_stock();

			// some notes to customer (replace true with false to make it private)
			$order->add_order_note( 'Hey, your order is paid! Thank you!', true );

			// Empty cart
			$woocommerce->cart->empty_cart();

			// Redirect to the thank you page
			return array(
				'result' => 'success',
				'redirect' => $this->get_return_url( $order )
			);

		 } else {
			wc_add_notice(  'Please try again.', 'error' );
			return;
		}

	} else {
		wc_add_notice(  'Connection error.', 'error' );
		return;
	}

}
5.3 In case you need a Payment Gateway Callback (Instant Payment Notifications, Webhooks etc)
Let’s say that our custom payment gateway doesn’t have its own form for the card data, and once the customer completed his billing details (like name, address etc) he will be redirected to a payment gateway website.
How can we check if payment is completed and display it in our store?
Manually? Huh, serious? ?
Many payment gateways have payment notifications and this is how it works — once a customer completed an order on a payment gateway website, the gateway sends a request with $_GET parameters to a specific URL of our website that we set on the gateway’s settings page. And WooCommerce allows to process these requests.
The webshook URLs (callback URLs) in Woo look like this: http://rudrastyh.com/wc-api/{webhook name}/, the hook name could be near anything, example paypal-payment-complete or just misha. It absolutely doesn’t mean what you will use here, the main requirement is that {webhook name} in the URL and {webhook name} in the filter (Step 3, line 54) must match.
add_action( 'woocommerce_api_{webhook name}', array( $this, 'webhook' ) );And webhook() is the function (class method) that can do anything with $_GET parameters received.
public function webhook() {

	$order = wc_get_order( $_GET['id'] );
	$order->payment_complete();
	$order->reduce_order_stock();

	update_option('webhook_debug', $_GET);
}
You do not have to add exit; at the end because it exits WordPress anyway once the code inside it is fired.
That’s all for this tutorial.